- Stop and unbind the guest domain (ldg1).
primary# ldm stop ldg1
primary# ldm unbind ldg1 - Add the Oracle Solaris ISO file as a secondary volume and virtual disk.
The following uses solarisdvd.iso as the Oracle Solaris ISO file, iso_vol@primary-vds0 as a secondary volume, and vdisk_iso as a virtual disk:
primary# ldm add-vdsdev /export/solarisdvd.iso  iso_vol@primary-vds0
primary# ldm add-vdisk vdisk_iso iso_vol@primary-vds0 ldg1
The following uses solarisdvd.iso as the Oracle Solaris ISO file, which is stored on the server1 server. iso_vol@primary-vds0 is a secondary volume, and vdisk_isois a virtual disk. The lofiadm command attaches a block device to the ISO image.
primary# lofiadm -a /net/server1/solarisdvd.iso
primary# ldm add-vdsdev /dev/lofi/1 iso_vol@primary-vds0
primary# ldm add-vdisk vdisk_iso iso_vol@primary-vds0 ldg1 - Check to see that the Oracle Solaris ISO file is added as a secondary volume and virtual disk.
primary# ldm list-bindings
NAME             STATE    FLAGS   CONS    VCPU  MEMORY   UTIL  UPTIME
primary          active   -n-cv   SP      4     4G       0.2%  22h 45m
...
VDS
   NAME             VOLUME         OPTIONS          DEVICE
   primary-vds0     vol1                            /dev/dsk/c2t1d0s2
   iso_vol                                          /export/solarisdvd.iso
....
------------------------------------------------------------------------------
NAME             STATE    FLAGS   CONS    VCPU  MEMORY   UTIL  UPTIME
ldg1             inactive -----           60    6G
...
DISK
   NAME       VOLUME               TOUT ID DEVICE  SERVER  MPGROUP
   vdisk1     vol1@primary-vds0
   vdisk_iso  iso_vol@primary-vds0
.... - Bind and start the guest domain (ldg1).
primary# ldm bind ldg1
primary# ldm start ldg1
LDom ldg1 started
primary# telnet localhost 5000
Trying 127.0.0.1...
Connected to localhost.
Escape character is '^]'.

Connecting to console "ldg1" in group "ldg1" ....
Press ~? for control options .. - Show the device aliases in the client OpenBoot PROM.
In this example, see the device aliases for vdisk_iso, which is the Oracle Solaris ISO image, and vdisk_install, which is the disk space.
ok devalias
vdisk_iso       /virtual-devices@100/channel-devices@200/disk@1
vdisk1          /virtual-devices@100/channel-devices@200/disk@0
vnet1           /virtual-devices@100/channel-devices@200/network@0
virtual-console /virtual-devices/console@1
name aliases - On the guest domain's console, boot from vdisk_iso (disk@1) on slice f.
ok boot vdisk_iso:f
Boot device: /virtual-devices@100/channel-devices@200/disk@1:f  File and args: -s
SunOS Release 5.10 Version Generic_139555-08 64-bit
Copyright (c) 1983-2010, Oracle and/or its affiliates. All rights reserved. - Continue with the Oracle Solaris OS installation menu.
Showing posts with label Oracle VM Server. Show all posts
Showing posts with label Oracle VM Server. Show all posts
Wednesday, June 3, 2020
How to Install the Oracle Solaris OS on a Guest Domain From an Oracle Solaris ISO File
How to Install the Oracle Solaris OS on a Guest Domain From a DVD
- Insert the Oracle Solaris 10 OS or Oracle Solaris 11 OS DVD into the DVD drive.
- Stop the volume management daemon, vold(1M), on the primary domain.
primary# svcadm disable volfs
- Stop and unbind the guest domain (ldg1).
primary# ldm stop ldg1
primary# ldm unbind ldg1 - Add the DVD with the DVD-ROM media as a secondary volume and virtual disk.
The following uses c0t0d0s2 as the DVD drive in which the Oracle Solaris media resides, dvd_vol@primary-vds0 as a secondary volume, and vdisk_cd_media as a virtual disk.
primary# ldm add-vdsdev options=ro /dev/dsk/c0t0d0s2 dvd_vol@primary-vds0
primary# ldm add-vdisk vdisk_cd_media dvd_vol@primary-vds0 ldg1 - Check to see that the DVD is added as a secondary volume and virtual disk.
primary# ldm list-bindings
NAME             STATE    FLAGS   CONS    VCPU  MEMORY   UTIL  UPTIME
primary          active   -n-cv   SP      4     4G       0.2%  22h 45m
...
VDS
   NAME             VOLUME         OPTIONS          DEVICE
   primary-vds0     vol1                            /dev/dsk/c2t1d0s2
   dvd_vol                                          /dev/dsk/c0t0d0s2
....
------------------------------------------------------------------------------
NAME             STATE    FLAGS   CONS    VCPU  MEMORY   UTIL  UPTIME
ldg1             inactive -----           60    6G
...
DISK
   NAME             VOLUME                      TOUT DEVICE  SERVER
   vdisk1           vol1@primary-vds0
   vdisk_cd_media   dvd_vol@primary-vds0
.... - Bind and start the guest domain (ldg1).
primary# ldm bind ldg1
primary# ldm start ldg1
LDom ldg1 started
primary# telnet localhost 5000
Trying 127.0.0.1...
Connected to localhost.
Escape character is '^]'.

Connecting to console "ldg1" in group "ldg1" ....
Press ~? for control options .. - Show the device aliases in the client OpenBoot PROM.
In this example, see the device aliases for vdisk_cd_media, which is the Oracle Solaris DVD, and vdisk1, which is a virtual disk on which you can install the Oracle Solaris OS.
ok devalias
vdisk_cd_media  /virtual-devices@100/channel-devices@200/disk@1
vdisk1          /virtual-devices@100/channel-devices@200/disk@0
vnet1           /virtual-devices@100/channel-devices@200/network@0
virtual-console /virtual-devices/console@1
name aliases - On the guest domain's console, boot from vdisk_cd_media (disk@1) on slice f.
ok boot vdisk_cd_media:f
Boot device: /virtual-devices@100/channel-devices@200/disk@1:f  File and args: -s
SunOS Release 5.10 Version Generic_139555-08 64-bit
Copyright (c), 1983-2010, Oracle and/or its affiliates. All rights reserved. - Continue with the Oracle Solaris OS installation menu.
Creating and Starting a Guest Domain
The guest domain must run an operating system that understands both the sun4v platform and the virtual devices presented by the hypervisor. Currently, this means that you must run at least the Oracle Solaris 10 11/06 OS. Running the Oracle Solaris 10 8/11 OS provides you with all the Oracle VM Server for SPARC 3.0 features. See the Oracle VM Server for SPARC 3.0 Release Notes for any specific patches that might be necessary. Once you have created default services and reallocated resources from the control domain, you can create and start a guest domain.
How to Create and Start a Guest Domain
- Create a logical domain.
For example, the following command would create a guest domain named ldg1.
primary# ldm add-domain ldg1
- Add CPUs to the guest domain.
For example, the following command would add eight virtual CPUs to guest domain ldg1.
primary# ldm add-vcpu 8 ldg1
- Add memory to the guest domain.
For example, the following command would add 2 gigabytes of memory to guest domain ldg1.
primary# ldm add-memory 2G ldg1
- Add a virtual network device to the guest domain.
For example, the following command would add a virtual network device with these specifics to the guest domain ldg1.
primary# ldm add-vnet vnet1 primary-vsw0 ldg1
Where:
-
vnet1 is a unique interface name to the logical domain, assigned to this virtual network device instance for reference on subsequent set-vnet or remove-vnet subcommands.
-
primary-vsw0 is the name of an existing network service (virtual switch) to which to connect.
Note - Steps 5 and 6 are simplified instructions for adding a virtual disk server device (vdsdev) to the primary domain and a virtual disk (vdisk) to the guest domain. To learn how ZFS volumes and file systems can be used as virtual disks, see How to Export a ZFS Volume as a Single-Slice Disk and Using ZFS With Virtual Disks.
-
- Specify the device to be exported by the virtual disk server as a virtual disk to the guest domain.
You can export a physical disk, disk slice, volumes, or file as a block device. The following examples show a physical disk and a file.
-
Physical Disk Example. The first example adds a physical disk with these specifics.
primary# ldm add-vdsdev /dev/dsk/c2t1d0s2 vol1@primary-vds0
Where:
-
/dev/dsk/c2t1d0s2 is the path name of the actual physical device. When adding a device, the path name must be paired with the device name.
-
vol1 is a unique name you must specify for the device being added to the virtual disk server. The volume name must be unique to this virtual disk server instance, because this name is exported by this virtual disk server to the clients for adding. When adding a device, the volume name must be paired with the path name of the actual device.
-
primary-vds0 is the name of the virtual disk server to which to add this device.
-
-
File Example. This second example is exporting a file as a block device.
primary# ldm add-vdsdev backend vol1@primary-vds0
Where:
-
backend is the path name of the actual file exported as a block device. When adding a device, the back end must be paired with the device name.
-
vol1 is a unique name you must specify for the device being added to the virtual disk server. The volume name must be unique to this virtual disk server instance, because this name is exported by this virtual disk server to the clients for adding. When adding a device, the volume name must be paired with the path name of the actual device.
-
primary-vds0 is the name of the virtual disk server to which to add this device.
-
-
- Add a virtual disk to the guest domain.
The following example adds a virtual disk to the guest domain ldg1.
primary# ldm add-vdisk vdisk1 vol1@primary-vds0 ldg1
Where:
-
vdisk1 is the name of the virtual disk.
-
vol1 is the name of the existing volume to which to connect.
-
primary-vds0 is the name of the existing virtual disk server to which to connect.
Note - The virtual disks are generic block devices that are associated with different types of physical devices, volumes, or files. A virtual disk is not synonymous with a SCSI disk and, therefore, excludes the target ID in the disk label. Virtual disks in a logical domain have the following format: cNdNsN, where cN is the virtual controller, dN is the virtual disk number, and sN is the slice.
-
- Set the auto-boot? and boot-device variables for the guest domain.
The first example command sets auto-boot? to true for guest domain ldg1.
primary# ldm set-var auto-boot\?=true ldg1
The second example command sets boot-device to vdisk1 for guest domain ldg1.
primary# ldm set-var boot-device=vdisk1 ldg1
- Bind resources to the guest domain ldg1 and then list the domain to verify that it is bound.
primary# ldm bind-domain ldg1
primary# ldm list-domain ldg1
NAME          STATE    FLAGS  CONS   VCPU MEMORY   UTIL  UPTIME
ldg1 bound ----- 5000 8 2G - To find the console port of the guest domain, you can look at the output of the preceding list-domain subcommand.
You can see under the heading CONS that logical domain guest 1 (ldg1) has its console output bound to port 5000.
- Connect to the console of a guest domain from another terminal by logging into the control domain and connecting directly to the console port on the local host.
$ ssh hostname.domain-name
$ telnet localhost 5000 - Start the guest domain ldg1.
primary# ldm start-domain ldg1
How to Enable the Virtual Network Terminal Server Daemon
Enabling the Virtual Network Terminal Server Daemon
You must enable the virtual network terminal server daemon (vntsd) to provide access to the virtual console of each logical domain. Refer to the vntsd(1M) man page for information about how to use this daemon.
Note - Be sure that you have created the default service vconscon (vcc) on the control domain before you enable vntsd. See Creating Default Services for more information.
- Use the svcadm command to enable the virtual network terminal server daemon, vntsd.
primary# svcadm enable vntsd
- Use the svcs command to verify that the vntsd daemon is enabled.
primary# svcs vntsd
STATE          STIME    FMRI
online         Oct_08   svc:/ldoms/vntsd:default
Rebooting to Use Logical Domains
You must reboot the control domain for the configuration changes to take effect and for the resources to be released for other logical domains to use.
How to Reboot
- Shut down and reboot the control domain.
primary# shutdown -y -g0 -i6
Note - Either a reboot or power cycle instantiates the new configuration. Only a power cycle actually boots the configuration saved to the service processor (SP), which is then reflected in the list-config output.
Creating virtual device services to use in the control domain as a service domain
The following virtual device services must be created to use the control domain as a service domain and to create virtual devices for other domains:
-
vcc – Virtual console concentrator service
-
vds – Virtual disk server
-
vsw – Virtual switch service
How to Create Default Services
- Create a virtual console concentrator (vcc) service for use by the virtual network terminal server daemon (vntsd) and as a concentrator for all logical domain consoles.
For example, the following command would add a virtual console concentrator service (primary-vcc0) with a port range from 5000 to 5100 to the control domain (primary).
primary# ldm add-vcc port-range=5000-5100 primary-vcc0 primary
- Create a virtual disk server (vds) to allow importing virtual disks into a logical domain.
For example, the following command adds a virtual disk server (primary-vds0) to the control domain (primary).
primary# ldm add-vds primary-vds0 primary
- Create a virtual switch service (vsw) to enable networking between virtual network (vnet) devices in logical domains.
Assign a GLDv3-compliant network adapter to the virtual switch if each logical domain must communicate outside the box through the virtual switch.
-
In Oracle Solaris 10, add a virtual switch service on network adapter driver to the control domain.
primary# ldm add-vsw net-dev=net-driver vsw-service primary
For example, the following command adds a virtual switch service (primary-vsw0) on network adapter driver nxge0 to the control domain (primary):
primary# ldm add-vsw net-dev=nxge0 primary-vsw0 primary
-
In Oracle Solaris 11, add a virtual switch service (primary-vsw0) on network adapter driver net0 to the control domain (primary):
primary# ldm add-vsw net-dev=net-driver vsw-service primary
For example, the following command adds a virtual switch service (primary-vsw0) on network adapter driver net0 to the control domain (primary):
primary# ldm add-vsw net-dev=net0 primary-vsw0 primary
-
The following applies to the Oracle Solaris 10 OS only and should not be performed on an Oracle Solaris 11 system.
This command automatically allocates a MAC address to the virtual switch. You can specify your own MAC address as an option to the ldm add-vsw command. However, in that case, it is your responsibility to ensure that the MAC address specified does not conflict with an already existing MAC address.
If the virtual switch being added replaces the underlying physical adapter as the primary network interface, it must be assigned the MAC address of the physical adapter, so that the Dynamic Host Configuration Protocol (DHCP) server assigns the domain the same IP address. See Enabling Networking Between the Control/Service Domain and Other Domains.
primary# ldm add-vsw mac-addr=2:04:4f:fb:9f:0d net-dev=nxge0 primary-vsw0 primary
-
- Verify the services have been created by using the list-services subcommand.
Your output should look similar to the following:
primary# ldm list-services primary
VDS
    NAME             VOLUME         OPTIONS          DEVICE
    primary-vds0

VCC
    NAME             PORT-RANGE
    primary-vcc0     5000-5100

VSW
    NAME             MAC               NET-DEV   DEVICE     MODE
    primary-vsw0     02:04:4f:fb:9f:0d nxge0     switch@0   prog,promisc
How to Restore the Factory Default Configuration From the Service Processor
If you remove the Logical Domains Manager before restoring the factory default configuration, you can restore the factory default configuration from the service processor.
- Restore the factory default configuration from the service processor.
-> set /HOST/bootmode config=factory-default
- Perform a power cycle of the system to load the factory default configuration.
-> reset /SYS
How to Remove the Logical Domains Manager
After restoring the factory default configuration and disabling the Logical Domains Manager, you can remove the Logical Domains Manager software.
Note - If you remove the Logical Domains Manager before restoring the factory default configuration, you can restore the factory default configuration from the service processor as shown in the following procedure.
- Remove the Logical Domains Manager software.
- Remove the Oracle Solaris 10 SUNWldm and SUNWldmp2v packages.
primary# pkgrm SUNWldm SUNWldmp2v
- Remove the Oracle Solaris 11 ldomsmanager package.
primary# pkg uninstall ldomsmanager
- Remove the Oracle Solaris 10 SUNWldm and SUNWldmp2v packages.
Factory Default Configuration and Disabling Logical Domains
How to Remove All Guest Domains
- Stop all domains by using the -a option.
primary# ldm stop-domain -a
- Unbind all domains except for the primary domain.
primary# ldm unbind-domain ldom
Note - You might be unable to unbind an I/O domain if it is providing services required by the control domain. In this situation, skip this step.
- Destroy all domains except for the primary domain.
primary# ldm remove-domain -a
How to Remove All Logical Domains Configurations
- List all the logical domain configurations that are stored on the service processor (SP).
primary# ldm list-config
- Remove all configurations (config-name) previously saved to the SP except for the factory-default configuration.
Use the following command for each such configuration:
primary# ldm rm-config config-name
After you remove all the configurations previously saved to the SP, the factory-default domain is the next domain to use when the control domain (primary) is rebooted.
How to Restore the Factory Default Configuration
- Select the factory default configuration.
primary# ldm set-config factory-default
- Stop the control domain.
primary# shutdown -i1 -g0 -y
- Perform a power cycle of the system to load the factory default configuration.
-> stop /SYS
-> start /SYS
How to Disable the Logical Domains Manager
- Disable the Logical Domains Manager from the control domain.
primary# svcadm disable ldmd
Note - Disabling the Logical Domains Manager does not stop any running domains, but does disable the ability to create a new domains, change the configuration of existing domains, or monitor the state of the domains.
How to Enable the Logical Domains Manager Daemon
Use this procedure to enable the ldmd daemon if it has been disabled.
- Use the svcadm command to enable the Logical Domains Manager daemon, ldmd.
For more information about the svcadm command, see the svcadm(1M) man page.
# svcadm enable ldmd
- Use the ldm list command to verify that the Logical Domains Manager is running.
The ldm list command should list all domains that are currently defined on the system. In particular, the primary domain should be listed and be in the active state. The following sample output shows that only the primary domain is defined on the system.
# /opt/SUNWldm/bin/ldm list
NAME             STATE    FLAGS   CONS    VCPU  MEMORY   UTIL  UPTIME
primary          active   ---c-   SP      64    3264M    0.3%  19d 9m
Installing Oracle VM Server for SPARC Software on a New System
SPARC platforms that support the Oracle VM Server for SPARC software come preinstalled with the Oracle Solaris 10 OS or the Oracle Solaris 11 OS. Initially, the platform appears as a single system hosting only one operating system. After the Oracle Solaris OS, system firmware, and Logical Domains Manager have been installed, the original system and instance of the Oracle Solaris OS become the control domain. That first domain of the platform is named primary, and you cannot change that name or destroy that domain. From there, the platform can be reconfigured to have multiple domains hosting different instances of the Oracle Solaris OS.
Downloading the Logical Domains Manager
You can obtain the latest packages for both the Oracle Solaris 10 OS and the Oracle Solaris 11 OS. Note that the Oracle VM Server for SPARC software is included by default with the Oracle Solaris 11 OS.
-
Oracle Solaris 10 OS. Download the OVM_Server_SPARC-3_0.zip package from My Oracle Support. See How to Download the Logical Domains Manager Software (Oracle Solaris 10).
-
Oracle Solaris 11 OS. Obtain the ldomsmanager package from the Oracle Solaris 11 Support Repository. See How to Upgrade to the Oracle VM Server for SPARC 3.0 Software (Oracle Solaris 11).
How to Download the Logical Domains Manager Software (Oracle Solaris 10)
- Download the zip file (OVM_Server_SPARC-3_0.zip).
You can find the software at http://www.oracle.com/virtualization/index.html.
- Unzip the zip file.
$ unzip OVM_Server_SPARC-3_0.zip
Automatically Installing the Logical Domains Manager Software
If you use the install-ldm installation script, you have several choices to specify how you want the script to run. Each choice is described in the procedures that follow.
-
Using the install-ldm script with no options does the following automatically:
-
Checks that the Oracle Solaris OS release is the Oracle Solaris 10 OS
-
Verifies that the package subdirectories SUNWldm/ and SUNWldmp2v/ are present
-
Verifies that the prerequisite Logical Domains driver packages, SUNWldomr and SUNWldomu, are present
-
Verifies that the SUNWldm and SUNWldmp2v packages have not been installed
-
Installs the Oracle VM Server for SPARC 3.0 software
-
Verifies that all packages are installed
-
If the SST (SUNWjass) is already installed, you are prompted to harden the Oracle Solaris OS on the control domain.
-
Determine whether to use the Oracle VM Server for SPARC Configuration Assistant (ldmconfig) to perform the installation.
-
-
Using the install-ldm script with the -c option automatically runs the Oracle VM Server for SPARC Configuration Assistant after the software is installed.
-
Using the install-ldm script with the -s option skips the running of the Oracle VM Server for SPARC Configuration Assistant.
-
Using the install-ldm script and the following options with the SST software enables you to do the following:
-
install-ldm -d. Allows you to specify a SST driver other than a driver ending with -secure.driver. This option automatically performs all the functions listed in the preceding choice and hardens the Oracle Solaris OS on the control domain with the SST customized driver that you specify; for example, the server-secure-myname.driver.
-
install-ldm -d none. Specifies that you do not want to harden the Oracle Solaris OS running on your control domain by using the SST. This option automatically performs all the functions except hardening listed in the preceding choices. Bypassing the use of the SST is not suggested and should only be done when you intend to harden your control domain using an alternate process.
-
install-ldm -p. Specifies that you only want to perform the post-installation actions of enabling the Logical Domains Manager daemon (ldmd) and running the SST. For example, you would use this option if the SUNWldm and SUNWjass packages are preinstalled on your server.
-
Manually Installing the Logical Domains Manager Software
The following procedure guides you through manually installing the Oracle VM Server for SPARC 3.0 software on the Oracle Solaris 10 OS.
When you install the Oracle Solaris 11 OS, the Oracle VM Server for SPARC 2.1 software is installed by default. If you want to install the Oracle VM Server for SPARC 3.0 software, see How to Upgrade to the Oracle VM Server for SPARC 3.0 Software (Oracle Solaris 11)
ownload the Oracle VM Server for SPARC 3.0 software (the SUNWldm and SUNWldmp2v packages). For instructions, see How to Download the Logical Domains Manager Software (Oracle Solaris 10).
- (Optional) Save your configuration to the service processor (SP), if necessary.
Perform this step only is you are already running an earlier version of the Oracle VM Server for SPARC software.
primary# ldm add-config config-name
- Install the SUNWldm.v and SUNWldmp2v packages.
# pkgadd -Gd . SUNWldm.v SUNWldmp2v
Answer y for yes to all questions in the interactive prompts.
The -G option installs the package in the global zone only. The -d option specifies the path to the directory that contains the SUNWldm.vand SUNWldmp2v packages.
For more information about the pkgadd command, see the pkgadd(1M) man page.
- Verify that the SUNWldm and SUNWldmp2v packages are installed.
The following revision (REV) information is an example:
# pkginfo -l SUNWldm | grep VERSION
VERSION=3.0,REV=2012.11.01.10.20
For more information about the pkginfo command, see the pkginfo(1) man page.
Monday, March 2, 2020
How To Access Guest Console In OVM 3 Using VNC Without Using OVM Manager
Earlier releases of OVM (2.x) documented manual configuration to enable access to virtual machine consoles through VNC without using the OVM 2.x manager:
E.3 Guest Console Access
With OVM3 this is achieved by redirecting the remote port to a local port using the ssh(1) command.
To do this, first find the id of the vm (this can be done in the Manager UI by expanding the entry for the vm, or using the "list vm" command in the CLI).
Then on the OVM Server ("ovs", aka "dom0") the vm is running on, issue the xm list command to find its ID, e.g.:
# xm list
Name ID Mem VCPUs State Time(s)
0004fb00000600005454e1ab286913be 2 4096 2 -b---- 424.6
Domain-0 0 840 8 r----- 478278.2
0004fb00000600005454e1ab286913be 2 4096 2 -b---- 424.6
Domain-0 0 840 8 r----- 478278.2
In this example the ID is 2.
Then find the port the vm console is listening on:
# xm list -l 2 | grep 59
(uuid 3c787270-abad-9595-8258-d27f03fd928d)
(location 127.0.0.1:5900)
(uuid 3c787270-abad-9595-8258-d27f03fd928d)
(location 127.0.0.1:5900)
In this example the vnc port for the vm is 5900.
On the system where you wish to display the console, open an ssh session to the ovm server and redirect the port to it, e.g.:
$ ssh -L 12345:localhost:5900 root@olvm-ovs00009
The "5900" port on the ovs will be redirected to port "12345" of your local desktop.
Leave this session open for the duration of the vnc session.
Then vncviewer can be used to open the vm console, e.g. from another terminal issue:
$ vncviewer localhost:12345
On a Windows system, you can use some other SSH client, e.g. PuTTY for the re-direct.
How To Regenerate The Oracle VM Manager 3.3.x/3.4.x DB
To regenerate the Oracle VM database you'll need to have access to the /u01/app/oracle/ovm-manager-3/.configfile. This file has the parameters of your database that will be used for the regeneration.
For Oracle VM 3.4. x release, please consider restoring a valid backup before regenerating the database.
The process for Regenerating your database should be:
- Stop the ovm services
- Delete the Manager Data Base The ovm_upgrade.sh command is used to delete the current Oracle VM database.
- Generate new certificates.
- Start the services
- Restart the ovm service for the certificate to be applied
- Repopulate the DB by discovering and refreshing the repositories
- To restore the simple names Use KM article: Restore OVM Manager "Simple Names" After a Rebuild/Reinstall (Doc ID 2129616.1)
Note: Anything in <> should be replaced with the value appropriate to your environment or filename.
1. The Oracle VM manager services need to be shutdown, to delete the OVM manager database.#service ovmm stop
2. Delete the current OVM database.
(Use the dbuser and password, not the ovm admin user/passowrd.)Using ovm_upgrade.sh from /u01/app/oracle/ovm-manager-3/ovm_upgrade/binand the values from the /u01/app/oracle/ovm-manager-3/.configfile, delete the bad database
Command syntax:
# sh ovm_upgrade.sh --deletedb --dbuser=<user> --dbpass=<password> --dbhost=localhost --dbport=<database-port> --dbsid=<your sid>
Obtain the values to substitute from the /u01/app/oracle/ovm-manager-3/.config on a management node:
# cat /u01/app/oracle/ovm-manager-3/.config
DBTYPE=MySQL
DBHOST=localhost
SID=ovs < --dbsid
LSNR=1521 < --dbport
OVSSCHEMA=ovs < --dbuser
APEX=8080
WLSADMIN=weblogic
OVSADMIN=admin
COREPORT=54321
UUID=0004fb00000100009bfa6a96c1303e32
BUILDID=3.2.11.775
default "--dbpass" is "Welcome1" - use appropriate value for your system.DBTYPE=MySQL
DBHOST=localhost
SID=ovs < --dbsid
LSNR=1521 < --dbport
OVSSCHEMA=ovs < --dbuser
APEX=8080
WLSADMIN=weblogic
OVSADMIN=admin
COREPORT=54321
UUID=0004fb00000100009bfa6a96c1303e32
BUILDID=3.2.11.775
Sample delete command based on the above sample .config file:
#sh /u01/app/oracle/ovm-manager-3/ovm_upgrade/bin/ovm_upgrade.sh --deletedb --dbuser=ovs --dbpass=Welcome1
--dbhost=localhost --dbport=1521 --dbsid=ovs
3. Start the OVM services and Generate the replacement certificate
#service ovmm start#export MW_HOME=/u01/app/oracle/Middleware
#/u01/app/oracle/ovm-manager-3/ovm_upgrade/bin/ovmkeytool.sh setupWebLogic
4. Activate the new certificate.
#sh /u01/app/oracle/ovm-manager-3/bin/configure_client_cert_login.sh
Stop then start the OVM service apply the new certificate.
#service ovmm stop
#service ovmm start
#service ovmm start
5. Repopulate the database
1) Login, the UI should be EMPTY of any data. The OVM servers and VMs are still up and running, the poolFS and repos already exist2) Repopulate the database by Rediscovering the environment using the Oracle OVM Manager UI.
The OVM database is rebuilt from the existing servers in the pool, so the relationships will already be established. The Servers and VMs are up and running, the pool filesystem the storage repositories are on the servers.
a. Discover Server(s) -> Pool/OVM Server(s) will be visible again
If your storage is network based, validate that your servers are listed under the storage tab.
If not "Discover server" and enter the name and IP of the storage array.
b. Refresh Repository (right click each storage, and choose refresh
c. Rediscover Server(s) -> VM's will reappear under the OVM Server(s). Non running VM's can be found under "Unassigned Virtual Machines"
Note: NFS and iSCSI repositories need to be re-discovered independently after "re-discover Oracle VM Servers" and "refresh-all on Server Pools",
because occasionally NFS repositories can not be re-discovered, and the regeneration does not recover iSCSI storage.
because occasionally NFS repositories can not be re-discovered, and the regeneration does not recover iSCSI storage.
6. Restore the simple names
This Database will be populated, but you will be missing items such as friendly disk names, display names for Vdisk, Vnics etc. (meta data)
Please refer to KM article: Restore OVM Manager "Simple Names" After a Rebuild/Reinstall (Doc ID 2129616.1) to restore the friendly names.
After the friendly names have been restored,
Logout, and close the browser.
Open a browser, and login.
The data base should be up and working with the friendly names (meta data)
Configure Secure TCP for Oracle VM Manager
The configuration of the TCPS service requires a certain amount of understanding about keystores and certificates. It is similar to the HTTPS configuration of Weblogic, so if you are involved in setting up overall Oracle VM security, this will be straightforward.
It's preferred to use the bundled scripts to create keystore and enable TCPS service for Oracle VM Manager.
When you perform a fresh install of Oracle VM Manager 3.1.1, 3.2.x or 3.3.x, scripts are provided under /u01/app/oracle/ovm-manager-3/bin of the Oracle VM Manager server
· secureOvmmTcpGenKeyStore.sh: create the keystore
· secureOvmmTcp.sh: use the generated keystore to enable the TCPS service for Oracle VM Manager
For Oracle VM Manager 3.2.x and 3.3.x, the scripts are included as part of the default installation.
For detailed instructions how to use the scripts, please refer to the documentation:
- Oracle VM Manager 3.1.1: Enabling Remote Log Ins of Oracle VM Installation and Upgrade Guide.
- Oracle VM Manager 3.2: http://docs.oracle.com/cd/E35328_01/E35330/html/vmiug-manager-tcps.html
- Oracle VM Manager 3.3: http://docs.oracle.com/cd/E50245_01/E50251/html/vmadm-utils-tcps.html
After you follow the instructions to create keystore and enable TCPS service for Oracle VM Manager. Once Oracle VM Manager is restarted, you can verify the status to confirm that Oracle VM Manager is now listening for TCPS requests on port 54322 by default.
| # netstat -a | grep 54322 tcp 0 0*:54322 *:* LISTEN |
For more information, see the following links:
- Oracle VM Download: http://www.oracle.com/technetwork/server-storage/vm/downloads/index.html
- Oracle VM Documentation: http://www.oracle.com/technetwork/server-storage/vm/documentation/index.html
- Oracle Enterprise Manager Documentation: Registering Oracle VM Manager
How to Create Virtual Disk without Oracle VM Manager
In some situations, it may be necessary to know how to create a Virtual Disk on OVM 2.2 without using OVM Manager, and attach it to a Virtual Machine.
This can be done in OVM 2.2 via the following process:
1. Log into the Oracle VM server where the VM is running.
2. Change the directory at which the repository is mounted, e.g.:
1. Log into the Oracle VM server where the VM is running.
2. Change the directory at which the repository is mounted, e.g.:
# cd /to/path/to/repo
3. Create the raw format .img disk image, e.g. initiating 4 GB Virtual Disk:
# dd if=/dev/zero of=newdisk.img bs=1M count=4096
4. Then add new disk image to disk = [ ] section of vm.cfg file of a Virtual Machine. Format:
disk = [ 'file:/mnt/el4u5_64_hvm//system.img,hda,w' ]
Note: Making any change to vm.cfg file effective requires a domain re-creation which is Virtual Machine shutdown then start (NOT restart.)
5. If an outage on the Virtual Machine is not possible, then hot plug read/write as /dev/xvdX by:
# xm block-attach [domain ID] /path/to/image /dev/xvdX w
To increase Virtual Machine Memory in the OVM Manager GUI ?
To increase Virtual Machine Memory in the OVM Manager GUI, Please follow the following steps
1. Using Oracle VM Manager GUI:
2. Login to Oracle VM Manager (GUI).
3. Select the VM and click on edit.
4. Check the assigned "Max. Memory (MB):" and "Memory (MB):".
5. If the "Max. Memory (MB):" is the same as "Memory (MB):", then you have to shut down the VM to increase the "Max. Memory (MB):" and "Memory (MB):".
6. If the "Max. Memory (MB):" is higher than the "Memory (MB):", then you can increase the "Memory (MB):" till "Max. Memory (MB):".
7. Ensure the "Memory (MB):" should not be higher than "Max. Memory (MB):"
8. Click on Save.
Login to the VM and verify allocated memory.
Memory allocated to the VM can be check by Oracle VM Manager either by going to the Server and
VM tab or by going to Health tab in GUI then selecting Server and VM statistics.
Friday, June 28, 2019
Oracle VM Using the P2V Utility
Using the P2V Utility
When you use the P2V utility, you are prompted for all required information.
To create a virtual machine image of a computer:
- Insert the Oracle VM Server CDROM into the CDROM drive of the computer you want to image.
Note
This procedure is for 64-bit computers. If you want to convert a 32-bit host computer to a virtual machine template, you must use the Oracle VM 2.x CD.
- Start the computer with the Oracle VM Server CDROM.
- The Oracle VM Server installation screen is displayed.

At the boot:prompt, enter:
p2v
Press Enter.
- The CD Found screen is displayed.

If you want to make sure the CDROM is error free, you can have the installer test it for errors. To test the CDROM, select OK and press Enter. The CDROM is tested and any errors are reported.
To skip media testing and continue with the installation, select Skip and press Enter.
- The P2V Network Configuration screen is displayed.
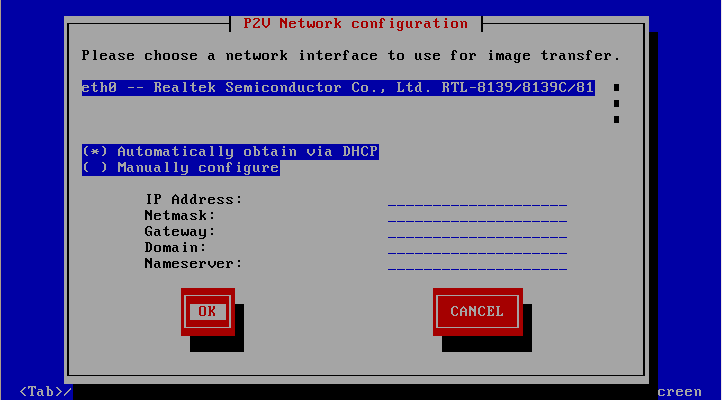
Select your Ethernet driver from the list displayed.
If your computer uses DHCP to assign its IP address, select Automatically obtain via DHCP.
If your computer uses a static IP address, select Manually configure, and enter the IP address and netmask, gateway, domain and name server for your computer.
Select OKand press Enter.
- The disk selection screen is displayed.

Select the disk partition(s) on the computer to include in the guest image. Select OK and press Enter.
- The Other parameters for VM screen is displayed.

Enter information about the guest image for:
- VM (guest) name
- VM (guest) memory
- Number of virtual CPUs
- Console password. This is no longer required, but you must enter a value.
Select OKand press Enter.
- A secure web server (HTTPS) is started. The IP address of the computer, and port number the web server is available on is displayed.

Open a web browser on another computer and enter the URL created using the information displayed on the computer running the P2V utility, for example
https://192.168.2.6/
You do not need to enter the port number as this is the default port number for HTTPs connections. A directory listing is displayed which contains the files created by the P2V utility. Take a note of the URLs for the vm.cfg and *.img files as you use them in the next step when importing the virtual machine into Oracle VM Manager.

Log in to Oracle VM Manager and import the guest using the import template feature. When you import the guest, you should add the URLs for each virtual disk image and the virtual machine configuration file on a new line in Template URLsfield in the Import Templatedialog, as shown below.

- When the virtual machine template is added to the repository, you should terminate the P2V utility on the host computer. Press Control+C to terminate the P2V utility on the computer. Remove the Oracle VM Server CDROM from your CDROM drive. Restart the computer.
The guest image is created and available in the repository as a hardware virtualized virtual machine template.
Subscribe to:
Posts (Atom)